Showing posts with label quick and easy. Show all posts

Sunday, August 2, 2009

A Quick and Tasty Pasta Dish

Recently I have managed to catch several of Giada and Ina’s shows on the Food Network. I really haven’t seen either of them in a while, so I really enjoyed seeing what they were cooking. Giada had one episode for quick and easy meals for a busy day. Well, Russ and I have lately wanted to eat at home more and I am always looking for a quick, easy, and tasty new meal. She made a one-dish meal of Ravioli with Arugula, Tomatoes, and Pancetta. I decided to make it the next night since I knew I had a lot to do during the day and wouldn’t have a lot of time for cooking that night.

To make the pasta dish you start by slicing the pancetta into small pieces and frying it in a skillet until it is crispy. Once it is done drain it onto a plate with paper towels. Meanwhile start the water for cooking the pasta and add the ravioli once it has come to a boil (I always salt my pasta water). Next add olive oil and the tomatoes (which are drained). I also added a couple cloves of diced fresh garlic. Then add the basil and arugula. The grocery store didn’t have just arugula, so I went with baby spinach instead. Gently toss the spinach as it wilts, so that it mixes in with everything else. Next add salt, pepper, and butter. Once it has all cooked together for a few minutes add the pancetta back in and then the cooked ravioli. Add a little more butter and carefully toss the pasta into the tomato / arugula mixture. Serve immediately.

This was a very simple and quick meal to put together. It only has a few ingredients yet the flavor is fantastic. It really exceeded my expectations. I told Russ that I obviously thought it would be good (or I wouldn’t have tried it), but I certainly had not thought it would be as flavorful as it turned out to be. I love the combination of spinach, tomatoes, and basil. We also both enjoyed the cheese ravioli which I haven’t bought since I was in graduate school. I also imagine that if you have children you could serve them some of the ravioli with just the tomatoes or with just Parmesan cheese on top if they are not interested in the spinach etc. All in all this was a tasty dish that will definitely be repeated in our house. Russ rates it an 8. (The picture of Cash is from the beach earlier this summer. He is a beach bum!)

Thursday, October 23, 2008

Our Old Favorite Stir Fry

Recently I talked about how my sister made the comment that I was fairly critical of stir fry recipes and I admitted that she is right (see this post). I mention that there is a recipe that there is an older Cooking Light stir fry recipe that we love that we used to make frequently and then for some reason have not made since I started blogging. Well, tonight I decided to revisit it to see if we still love it like we remember and in hopes of blogging about a chicken stir fry recipe that we really love. The recipe is for Kung Pao Chicken.

To make the Kung Pao chicken you start by adding a little bit of oil a non-stick skillet or a wok if you happen to have one. Then add the broccoli florets and some of the ginger and saute for a couple of minutes. Then add just a little bit of water and cover the pan and let the broccoli stem until it is done like you like it. For stir fries I like to have my vegatables slightly on the crunchy side. Then remove the broccoli from the pan and set aside. Add the rest of the oil to the pan along with the remaining ginger, crushed red pepper and chicken. Saute for a couple of minutes. While the chicken is cooking add the chicken broth, hoisen sauce, soy sauce, rice wine vinegar, cornstarch, and minced garlic to a bowl and wisk it all together. Then add the sauce to the pan and let it cook for about a minute until it thickens. Then add the broccoli and toss it to mix everything together and coat it with the sauce. Serve over hot rice and top with peanuts. I did make two additions to the recipe by adding bamboo shoots and onions to it. I love both bamboo shoots and onions and think they work well with the broccoli and add a little complexity and more texture to the dish. Also, the pictures are of Russ' plate without peanuts since he doesn't care for them in his food; I on the other hand love the crunch and saltiness that they add.

I absolutely love this simple stir fry. It takes little preparation, cooks quickly and is an entire meal in and of itself. Now, if you don't happen to keep ingredients like hoisen sauce, rice wine vinegar and ginger around I don't want this to turn you off from this recipe. When I first started cooking I wanted to try different Asian recipes, but was concerned that I would end up with a fridge and pantry full of bottles of sauces that I would never use again. Well, I finally bit the bullet and bought hoisen sauce and made this recipe. I now have a pantry and fridge full of Asian ingredients that all get used frequently. Back to my review... I really enjoy the slightly sweet, yet spicy sauce in this dish. The sauce really makes this for me and is part of why I am often critical of sauces in other stir fries. I think this sauce is incredibly well balanced with a hint of sweet from the hoisen sauce and a punch of flavor from the garlic and rounded out with a kick from the crushed red pepper. We usually serve this over brown rice, but tonight we used white as we were out of brown. Both work well, but we prefer the brown as white tends to be fairly bland. Russ rates this a 9.

Since Cash has not made an appearance on the blog in far too long here are a few new ones of him including one in his Halloween costume!

Wednesday, October 22, 2008

Chef Russ

While I do most of the cooking in our house, Russ is very involved. He does all the grilling, dishes, pictures for the blog and sometimes he takes the reigns and cooks the entire meal. Tonight was one of those nights when I had a meeting after work and knew I would come home hungry, too tired to cook, yet wanting a home cooked meal. Enter the sweetest husband ever who cooked up his new specialty that he has made once before for me, Pasta Puttanesca while I was at my meeting.

Russ loves this recipe because not only does it taste great, but he says it is fairly simple to prepare and all the ingredients are ones that almost always have in the pantry. I love it because it is delicious and required no effort on my part. It has great flavor from the capers and garlic, a nice kick from the fresh cayenne peppers from our garden, and fantastic color and texture from the olives. The tomatoes still take center stage and are just amplified by all the other tasty ingredients. I give it a 10 and Russ rates it a 9.

Monday, October 6, 2008

Leftovers Recreated

Now that it is October and January was months ago my poor New Year’s resolutions have been a bit forgotten. If you happen to remember they were to cook from some of the neglected cookbooks that are on my shelf and to create my own recipes. Tonight I somewhat resurrected my resolutions by creating my own quesadilla recipe. Apparently the only things so far this year that I am creating on my own are quesadilla recipes, but to my credit both have been very good.

Tonight I had several tasty leftover ingredients in the fridge that I didn’t want to go to waste, so I decided to combine them all for a tasty quick dinner. The ingredients I had were fresh spinach, goat cheese, and grilled chicken all of which go together really well. I sautéed the spinach with a little bit of chopped onion until it was wilted. Next I took the tortilla and put it in the nonstick skillet that I coated with cooking spray and layered the spinach, goat cheese, and chicken on top. I then topped it with a little more cheese and another tortilla. I let it cook until everything was heated through, the cheese had melted, and it was a browned on both sides. I served it with salsa and sour cream.

This was a super fast meal that was very tasty. The goat cheese complements both the spinach really well and the chicken adds a heartiness to the meal. I love fresh spinach and it cooks so fast and is such a beautiful color that it really makes the meal. These could not have been easier and while far from gourmet they were a perfect quick weeknight dinner. Russ rates the quesadillas an 8.

Tuesday, September 30, 2008

A Big Hit with No Meat!

Every now and then my meat loving husband will agree to a vegetarian meal if enough cheese is involved. Tonight was one of those rare occasions. Whenever I go through a new issue of Cooking Light I dog ear the pages of recipes that catch my eye. In the September issue this was one that not only did I dog ear, but also I kept coming back to each time I flipped through it. The recipe is for Ziti with Spinach, Cherry Tomatoes, and Gorgonzola Sauce. Russ and I both love macaroni and cheese and Cooking Light touts this recipe as a grown up version by showcasing the pungent flavor of gorgonzola cheese.

To make this dish you start by heating the water and cooking the pasta. This dish comes together so fast that you have to start the pasta first or you will be sitting around waiting on it. Then heat olive oil in a pan and add the cherry tomatoes, crushed red pepper, salt, and garlic. Once they have cooked for a minute or two then add the half and half and gorgonzola cheese and cook it for about two minutes while stirring constantly. Once it has thickened some add the spinach and allow it to wilt. Drain the pasta and then add the pasta to the pan with the sauce and mix to combine. Serve immediately.

This could not have been any quicker or easier to make. The most time consuming part is literally boiling the water for the pasta and cooking the pasta. This is a great weeknight dinner when you don’t have a lot of time or just don’t want to spend a lot of time in the kitchen. It is also a great one dish meal since it includes your veggies. The strong pungent flavor of the gorgonzola is fantastic and creamy. The sauce while still being light is rich and wonderful. The spinach and cherry tomatoes add beautiful colors to the dish and great, fresh flavors. We both thoroughly enjoyed this dish and it will definitely be repeated in our house. Russ rates it a 10.

Sunday, June 29, 2008

A Perfect Summer Dinner

Lately the days have been hot and hotter and by the end of the day Russ and I both want just a light, fresh meal for dinner. Tonight’s dish is exactly that – light and fresh and perfect for a hot summer night.

Tonight I made Sautéed Chicken Paillards with Herb Salad and White Balsamic Vinaigrette from the May issue of Fine Cooking. This came from the quick and delicious section, so it is quick and easy for a weeknight dinner. You start by making the dressing. You mix both the white balsamic and white wine vinegars together with the shallot, mustard, salt and pepper. Then you slowly whisk in the olive oil into it until combined. Next you season both sides of the chicken with salt and pepper. Now I usually stay away from convenience items because they are more expensive and I just prefer to chop my own onion, garlic etc., but when it comes to chicken cutlets I let the grocery store do the pounding. This to me is worth the extra little bit to not have to pound away at the chicken. Once the chicken is seasoned you heat the olive oil in a skillet and then cook the chicken until it is browned on both sides and just cooked through. Next toss the mixed greens and herbs with the salad dressing reserving some of the dressing to drizzle over the chicken. To plate the dish you place the chicken on the plate and drizzle it with the reserved dressing and top it with a large pile of the mixed greens and herbs. For the herbs I used a mixture of mint, parsley, and basil.

This was a very quick and easy and absolutely delicious! It was light and fresh with the bright dressing just topping it all off. The dressing was perfect with the shallots adding a nice flavor and texture and the mustard adding warmth and tang. We both also loved the mixture of mixed greens and herbs. Russ felt like the parsley was a little too strong, so next time I’ll cut back on it a little bit and add a little more mint which was a great flavor addition to the meal. The herbs definitely made the dish feel and taste like summer. The chicken complemented the salad perfectly and was very tasty with the drizzle dressing over it. This was close to the perfect summer dinner and Russ rates it a 10. This will definitely be repeated in our house.

Sautéed Chicken Paillards with Herb Salad and White Balsamic Vinaigrette, Fine Cooking May 2008

1 Tbs. white balsamic vinegar
1-1/2 tsp. white-wine or cider vinegar
One-half small shallot, finely chopped
1/4 tsp. Dijon mustard
Kosher salt and freshly ground black pepper
3 Tbs. plus 2 tsp. olive oil; more as needed
8 boneless, skinless, thin-cut (1/4- to 1/2-inch-thick) chicken breast cutlets (1-1/2 to 1-3/4 lb.)
5 cups mixed baby greens
3 cups mixed fresh, tender herb leaves, such as flat-leaf parsley, mint, chives, tarragon, basil, and chervil, roughly torn if large

In a small bowl, mix both vinegars with the shallot, mustard, and 1/4 tsp. each salt and pepper. Slowly whisk in 3 Tbs. of the oil.

Season the chicken on both sides with 1 tsp. salt and 1/2 tsp. pepper. Heat the remaining 2 tsp. oil in a 12-inch skillet over medium-high heat until hot. Working in two to three batches to avoid crowding, cook the chicken until lightly browned on both sides and just cooked through, 1 to 3 minutes per side. Transfer each batch to a platter, cover loosely with foil, and keep warm. If the pan seems dry at any point, add 2 more tsp. of oil.

Combine the greens and herbs in a large bowl. Add about three-quarters of the vinaigrette and toss well. To serve, arrange two cutlets on each serving plate and drizzle the remaining dressing over the chicken. Divide the herb salad among the four plates, piling it attractively onto the chicken.

Wednesday, June 25, 2008

Without the Beans...

It is not uncommon for me to make minor tweaks to recipes. Sometimes it as simple as just not measuring ingredients, but eyeballing them or swapping out one ingredient for another or leaving out a minor ingredient. Well, tonight I did something I haven’t done before… I intentionally left out a major ingredient. Jamie Oliver recently did an episode titled “Peas and Broad Beans” and I decided to make his Quick Sausage Meatballs with a Tomato and Basil Sauce, Spaghetti, and Sweet Raw Peas from it only I left out the peas. Now I know I said it was intentional, but that is not exactly the truth. The truth is I looked for the peas at the store, but I just went to the regular grocery store and not a vegetable market or a grocery store with more variety and consequently didn’t find them. So, I made the call to go ahead with the recipe and leave out the peas, which was disappointing as I was curious how the raw peas would work in the recipe. In the end the recipe was delicious despite my leaving out the peas, only I am still left wondering what it would have been like had I included them… I guess there is always next time.

To make Jamie’s Quick Sausage Meatballs with a Tomato and Basil Sauce, Spaghetti, and Sweet Raw Peas you start by snipping the end of the casing on the sausage (I used turkey sausage instead of pork) and then pushing the meat out into imperfect balls. These then sauté in olive oil until they are cooked through. While the sausage meatballs are cooking go ahead and start the water for the spaghetti and once it comes to a boil salt it and add the pasta. Once the meatballs are just about done cooking add some herbs to the pan. I used chopped fresh thyme, basil and parsley. In order to cut down the number of pans I was using I removed the sausages from the pan and then made the tomato sauce in the same pan where as the recipe calls for doing them in separate pans. To make the tomato sauce you start by heating olive oil and adding chopped garlic and basil stalks to it. Once these have cooked for a couple of minutes add some of the basil leaves and the cans of tomatoes. Season with salt and pepper to taste. Bring this to a simmer and break up the tomatoes with a spoon or spatula and add a swig of balsamic vinegar to the dish. At this point I added the meatballs into the tomato sauce and let it simmer until everything was hot and incorporated. Serve over the pasta and top with fresh basil and Parmesan cheese.

As the recipe name indicates this really is a quick meal. It came together in very little time and was easy to do. I loved the simple tomato sauce, which had a great fresh flavor from the herbs and a little kick from the vinegar. I thought the sauce was so tasty that I would have been happy without the meatballs. However, the sausage meatballs were the easiest meatballs I have ever made and they did add nice texture and density to the dish. Russ loved the meatballs and thought they really completed the meal. While I was disappointed to not have the fresh beans to include in the dish, it was a wonderful meal that was perfect for a weeknight dinner. Russ rates the meal a 9.

Monday, June 2, 2008

Dip and Drinks

I am not sure why, but appetizers are one of my real weaknesses when it comes to cooking. Just look to the left at the number of times I have posted about appetizers since I started blogging… six, just six appetizers in over a year. Now, to my credit there are plenty of times we have served cheese and crackers, fruit, chips and salsa, or cashews as appetizers and while these are all tasty they are not creative, exciting, or different. I think part of my issue is that if I am cooking the entire meal then I don’t leave enough time or don’t start preparing far enough in advance to include a more creative appetizer. Also, there are plenty of appetizer recipes out there that would take you just as long to prepare as a main course and somehow on nights like tonight when that is all I am preparing then I feel like I should get a break and not have to work as hard for just an appetizer. The thing is though when we eat out appetizers tend to be my favorite. I love the idea that they are tiny dishes that can still have all the flavor, complexity, and texture of a main course, but in a nice small package. Tonight I decided to not go the super simple / quick and easy route, but to not get too elaborate or involved either. I flipped through my cookbook from Magnolias and found a recipe for their Spinach and Artichoke Dip. After reading through the ingredients I was sold on it. You might be thinking in my excitement over the recipe that I forgot about dessert. Me… forget about dessert… are you kidding! We planned what we were doing for dessert a week and a half ago! More on it later.
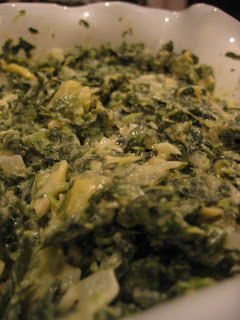
To make the Spinach and Artichoke Dip you start by sautéing the onions in butter. Once they are soft you add the garlic and let it sauté for a few minutes. Next add the flour and stir everything together to make a roux. Keep stirring it for a couple minutes and then add half the cream until it thickens. Then add the rest of the cream and let it thicken. Next add the spinach (thawed and drained), artichokes (chopped), Havarti cheese, Parmesan cheese, nutmeg, cayenne, salt, and pepper. Stir this together and let it cook for a few minutes. Serve warm with herb toasts. Russ made the herb toasts and he started by making the olive oil, herb mixture. He minced the garlic, chives, and basil. He put these in a bowl and added the olive oil, salt, and pepper. After mixing it all together he cut the baguette into quarter inch thick slices. He then tossed the slices in a bowl and poured the mixture over them tossing to coat. These then bake at 350 for about 10 minutes. They can be served at room temperature.

This really turned out well. The Spinach and Artichoke Dip was creamy and warm with a nice balance of cheese, spinach, and artichoke. I felt like the nutmeg and cayenne didn’t really show through. Next time I might increase the amount of both slightly to add a little more of a kick and spice to it. The herb toasts were a nice change from a plain baguette, but I do think a plain baguette slices (toasted, untoasted, or grilled) would work fine too. Russ and I did taste test it after I finished it and felt like it was slightly salty. I added a little more cream and let it cook down to try to counter act the saltiness and I think it worked. Next time I won’t add all the salt at first, but add part of it and then taste it before adding any more. All in all this was very tasty and creamy and a real hit. While not a complicated appetizer it was well worth the effort and a nice change from cheese and crackers. Russ rates it a 10!

I still haven’t forgotten about dessert and I guess you could say I am saving the best for last. The Country Club makes these amazing dessert drinks called Mississippi Muds. We both love them and Russ figured out that all they are made of is vanilla ice cream and Kahlua. The key is to getting the right consistency – thick, but not too thick. Russ has been practicing and he made them for everyone tonight for dessert. They are creamy and sweet without being too sweet. It is a great quick and easy dessert. They were a huge hit that even the non-sweet eater of the group, Dowe, requested one! Unfortunately we drank them before getting a picture, but I imagine they’ll show up again on the blog another day. Russ wouldn't rate them since he made them, but I'll give them a 9. They were a little on the thick side this time or they would have received a 10.

Spinach and Arthichoke Dip, Magnolias - Authentic Southern Cuisine
Makes 3 ½ cups

3 tablespoons butter
½ cup minced onion
1 tablespoon plus 1 teaspoon minced garlic
2 tablespoons all-purpose flour
1 ½ cups heavy cream
3 (10 oz) packages frozen spinach, thawed and all the liquid pressed out
1 (14 oz) can artichoke hearts, drained and cut into ½ inch pieces
6 ounces Havarti or fontina cheese, grated or finely diced
½ cup freshly grated Parmesan cheese
¼ teaspoon freshly grated nutmeg
1 ½ teaspoons fine sea salt
¼ teaspoon white pepper
¼ teaspoon ground black pepper
¼ teaspoon cayenne pepper

Melt the butter in a saucepan over medium heat. Add the onion and sauté for 2 minutes, stirring to prevent browning. Add the garlic and sauté for 1 minute. Sprinkle the flour over the onion and garlic mixture to make a roux. Stir well to combine and allow to cook over medium-low heat 1 minute more. Add half the cream and stir vigorously until the mixture combines and thickens. Use a spatula to release any of the mixture that may be stuck to the bottom edges of the pan. Add the remaining cream and stir again until the mixture is smooth and thickened. Add the spinach, artichoke hearts, Havarti or fontina cheese, Parmesan, nutmeg, salt, white, black, and cayenne pepper. Continue to stir over medium-low heat until the cheeses have melted. Check seasoning for a balanced flavor. Serve with Herb Toasts.

Herb Toasts, Magnolias – Authentic Southern Cuisine

¾ cup light olive oil
2 teaspoons mashed garlic
1 tablespoon very finely minced chives
1 tablespoon very finely minced basil
½ teaspoon salt
½ teaspoon freshly ground pepper
1 long loaf of fresh, crusty French bread cut into ¼ inch thick slices (or less)

Preheat an oven to 350 degrees.

Combine all of the ingredients except the French bread and let sit for 15 minutes. Place the slices of bread in a large bowl and drizzle on the oil and herb mixture as you are tossing the bread slices to coat. Lay the bread slices out on a baking sheet. Bake for 8 to 10 minutes, or until they are crisply toasted and light golden in color. Remove from the oven and allow for them to cool to room temperature before stacking in a basket.

Tuesday, May 27, 2008

Simple Fish with a Fancy Relish

I love a three day weekend (of course who doesn’t)! For Memorial Day weekend we went up to Mentone with a few friends to relax and enjoy the nice the weather. As I mentioned in my last couple of posts May has been a really busy, fun month. It just seems like we have been going non-stop, so I told Russ earlier this week that while I love cooking I just didn’t have the time or energy to do any menu planning or shopping for this weekend. Being the sweet husband that he is he planned out all of the meals and did all of the grocery shopping. He also included eating out one night at Canyon Grill, one of our favorite restaurants! I had a delicious halibut that was pan sautéed and served with capers and lemons juice (piccata style). It was wonderful! The next day I was relaxing on the porch and reading my most recent copies of Cooking Light and Fine Cooking and found lots of recipes for halibut. Since I enjoyed my halibut so much at Canyon Grill I decided to put it on the menu for this week.

I decided to try the Fire-Roasted Pepper Relish from Fine Cooking and serve it over halibut. To make the relish you first roast the peppers. Now, I normally would roast my own peppers, but a friend of mine recently gave me a jar of fabulous fire-roasted red peppers, so I decided to use those tonight. Whether your roast your own or use jarred you slice the peppers into wide strips. Put them in a bowl and add the remaining ingredients. Mix everything together and let it sit while you cook the fish. Originally Russ was going to grill the fish outside, but since it was raining we decided to pan sauté it inside. I simply rubbed the fish with a little olive oil and sprinkled it with salt and pepper. I then got my sauté pan hot and put the fish side down and let it cook for several minutes on that side. I then flipped it (so the skin side is down) and let it cook a few more minutes. I served the relish on top of the fish with a side of roasted green beans.

I love roasted red pepper, olives, and capers, so it was no surprise that I loved the relish. It had a wonderful mix of shapes and sizes that gave great texture combined with the soft flakiness of the fish. I like that the mildness of the halibut was complemented by the bright flavors of the relish. Our only complaint was that the parsley didn’t seem to fit with the rest of the flavors and tasted a little off. I’ll be honest I am not sure if we didn’t just get a not so great, not so fresh bunch of parsley at the store (all the more reason I need to finish up my herb garden outside!). Either way, next time I think I will skip the parsley and use either cilantro or basil. All in all this was a delicious, simple, quick and easy meal that was perfect for a weeknight. Russ rates the halibut with the relish a 9. He said that it would have received a 10 had the parsley not been included.

Fire-Roasted Pepper Relish, Fine Cooking
Yields about 2 cups

Serve over grilled steak, chicken breast, or fish fillet such as halibut or swordfish. The recipe calls for both parsley and cilantro, but feel free to use other herbs like sliced chives or chopped basil.

3 red or orange bell peppers
¼ cup pitted Nicoise or Kalamata olives, halved
¼ cup fresh flat-leaf parsley, very roughly chopped
¼ cup fresh cilantro, very roughly chopped
2 Tbs. thinly sliced scallions
2 Tbs. extra-virgin olive oil
1 Tbs. capers, rinsed
½ tsp. minced garlic
½ tsp. minced jalapeno or Serrano
Finely grated zest of 1 lemon plus a squeeze of lemon juice
Kosher or sea salt and freshly ground black pepper

Prepare a hot gas or charcoal grill fire. Cut the tops and bottoms from the peppers and cut the peppers into 3 or 4 flat pieces, discarding the tops, seeds, and ribs. Grill the pepper sides and bottoms skin side down until blistered and charred all over; 6 to 8 minutes. Put the peppers in a bowl and cover with a plate. Let sit until cool enough to handle. Peel the charred skin and discard. Don’t be too concerned if flecks of skin remain attached. Cut the peppers into bite-size pieces or wide strips.

Put the pepper pieces in a medium bowl and add the remaining ingredients, stirring well and seasoning to taste with lemon juice, salt, and pepper.

Make ahead: The relish keeps well in the refrigerator in a sealed container for at least a week. It’s best to make it a couple of hours ahead to allow the flavors to develop.

Tuesday, April 29, 2008

Another So So Bachelor Performance

I am not sure how many of you watch “The Bachelor” anymore, but Emily, Elizabeth and I have all decided that it each season gets a little trashier than the previous. So, we’ve started talking about maybe finding a new show to replace “The Bachelor” for our get togethers. Much like the show I feel like Russ and my food contributions have also gone downhill over the seasons too. You might remember a few of our not so great contributions like the Stuffed Chicken Breasts that took forever and were just okay, or the Shish Kebabs that got a little over cooked, or there was another recent Bachelor that didn’t make it to the blog where I made the Roasted Broccoli (that I raved about here) only to under cook it and that is just naming a few... So, tonight Russ and I are in charge of the appetizer and dessert. I decide to try a new recipe for the appetizer and go with a fool proof dessert recipe repeating the Oatmeal, Chocolate Chip Cookies that I made here. Well, despite the fact that the appetizer featured two of my favorite foods – roasted red peppers and goat cheese – the recipe as a whole fell flat and was didn’t take advantage of these amazing ingredients. Oh, the cookies you ask… well I forgot to soften the butter and I was running late, so I picked up some ice cream sandwiches at the store… at least they were tasty!

The appetizer I made tonight is Goat Cheese Spread with Roasted Red Peppers from the Birmingham Junior League "Food for Thought" cookbook (which is one of my underused cookbooks and counts towards my New Year's Resolution!). To make it you start by combining the goat cheese, cream cheese, and thyme. I did this in the food processor, but if you don’t have one you could do it by hand. Spread this evenly in a serving dish and set it in the fridge to chill. Next you roast the red peppers. You can do this several ways, but tonight I decided to just do it on the stove top (must be gas). You just lay them over the flame and turn them periodically until they are fairly black. Then toss them in a zip lock bag and let them hang out for a few minutes. Once they have cooled, pull them out, and peel off the outer peel. Then cut them into pieces and puree them in the food processor. Pull out the cheese spread and pile the red pepper puree evenly over the top. The recipe instructs you use plastic wrap to pull the cheese spread out and put it on a plate and then top it with the peppers. While this may be a little more appealing as far as appearance I didn’t find it necessary so I just left it in my container. I served it with crostini (slices of baguette that Russ grilled lightly on both sides).

As I mentioned earlier roasted red peppers and goat cheese are two of my favorite foods (hence why I selected this recipe to try). Despite having these two ingredients the recipe just didn’t add any extra flavor to them and didn’t do a good job in bringing the flavors together. To be honest it would have been just as tasty and easier to just take the crostini and spread some goat cheese on it and top it with a roasted red pepper. The thyme didn’t add much flavor and the cream cheese while it added some creaminess to the dip it really wasn’t necessary. All in all it was just okay and with a combination of goat cheese and roasted red peppers you could definitely come up with a better way of pairing them. Russ rates the dip a 7. In case you are wondering what show we are going to start watching after this season of The Bachelor... well we just discovered that they are doing another Bachelorette season - so we have to watch that!

Goat Cheese Spread with Roasted Red Peppers, Food for Thought
Makes 2 Cups

Ingredients:
1 (8oz) package cream cheese, softened
8 ounces goat cheese, crumbled
1 teaspoon olive oil
2 teaspoons fresh thyme leaves
3 sweet red peppers

Combine the first 4 ingredients in the food processor, and blend until smooth. Press mixture into a ramekin or mold lined with plastic wrap and chill. Roast peppers over gas flame or under broiler, turning until the skins are charred all over. Place peppers in a bowl, cover tightly with plastic wrap, and set aside for 20 minutes. Halve the peppers and remove the cores; peel off skin. Cut peppers into 1 inch strips, and place strips in the food processor; pulse 3 or 4 times. Unmold chilled cheese mixture; top with red pepper puree. Serve with crostini or melba toast.

Wednesday, April 16, 2008

Exceeding Expectations

I have always liked mayonnaise spread on my sandwiches in fact it is my preferred condiment when it comes to sandwiches. It has a creamy texture and great flavor that just add that perfect touch to a sandwich. I’ve always loved it in chicken salad and pimento salad too. It wasn’t until I ate hot artichoke dip for the first time and requested the recipe that I realized I’ve probably been eating mayonnaise in lots of other dishes for years and not even known it. When I saw the ingredients in baked artichoke dip for the first time I almost fell out of my chair. I couldn’t believe that baked mayonnaise with just some cheese and chopped artichokes could be good. I mean really the thought of hot mayonnaise is disgusting and this is coming from a long time fan of mayonnaise. I am not sure I will ever understand how hot, baked mayonnaise can actually taste good, but you know what it really does. Even knowing that I like it baked in dishes such as hot artichoke dip I am still skeptical every time I try a new recipe that involves baking with mayonnaise. Tonight’s recipe was no exception. After reading the recipe I thought these are going to taste like hot mayonnaise… but once again I was proven wrong. I guess I need to just accept the fact that I am an all around fan of mayonnaise cold or hot.

To make the chicken tenders you start by mixing the panko with salt and pepper in a shallow bowl. I would highly recommend not substituting a different kind of bread crumb for the panko. You can now find panko in almost every grocery store and it really is the best for this recipe. Then you trim the chicken tenders to remove any of the exposed tendon if they have it. Then in another bowl mix the mayonnaise, hot sauce (I used wing sauce), cayenne, and salt together. Then add the chicken tenders to the mayonnaise mixture and make sure each one gets a good coat on it. Then take each chicken tender and roll it around in the panko mixture and then place them on a rimmed baking sheet. Preheat the broiler for at least ten minutes. Once the broiler has been thoroughly heated then put the baking sheet in making sure it is far enough away from the flames to not burn the breading. Let them broil for about 6 minutes on each side. While they are broiling mix the blue cheese, sour cream, milk, salt and pepper together in a bowl. This made a lot, so next time I would cut this back by half. I served the chicken tenders with carrot sticks, celery sticks, and John’s slaw.

These really exceeded my expectations! They were crisp on the outside and moist on the inside. They had a little bit of a kick from the wing sauce and cayenne without being too spicy. They were really simple and quick to make in fact I think tonight was the earliest we have eaten dinner in a long time. These were excellent as an entrée, but I think they would also make a fabulous appetizer or great game day food (if you are watching the game at home). The blue cheese dipping sauce was very creamy and tasty. I felt like it definitely had a fresher and brighter flavor than most store bought blue cheese dressings. It did make a ton, so as I mentioned before next time I'll cut the recipe for the sauce in half. Russ and I both really enjoyed the chicken tneders and blue cheese dipping sauce. After a having the last four recipes come in at 8s I have finally broken the streak and Russ gave the chicken tenders a 10! (Hass: I think you would really like these.)

Crisp and Spicy Chicken Tenders with Blue Cheese Dipping Sauce, Fine Cooking
Serves four.

Ingredients:

2-1/2 cups panko (Japanese breadcrumbs)Kosher salt and freshly ground black pepper1-1/2 lb. chicken tenders3/4 cup mayonnaise1 Tbs. hot pepper sauce (I actually used our favorite wing sauce – Phil’s)1/4 tsp. cayenne3/4 cup crumbled blue cheese (about 4 oz.)1/2 cup sour cream3 Tbs. milk

Pour the panko into a shallow dish (like a pie pan) and toss with 3/4 tsp. salt and 1/4 tsp. pepper.

Trim off any exposed tendon ends from the wide tips of the chicken tenders, if necessary. In a medium bowl, whisk 1/4 cup of the mayonnaise with the hot sauce, cayenne, and 1/8 tsp. salt. Add the chicken and toss with your hands to coat well. Coat each tender in the panko and arrange in a single layer on a heavy-duty rimmed baking sheet. Refrigerate while you heat the broiler and make the sauce. Position an oven rack 6 inches from the broiler element and heat the broiler on high for at least 10 minutes.

Meanwhile, combine the remaining 1/2 cup mayonnaise with the blue cheese, sour cream, milk, 1/2 tsp. salt, and a few grinds of pepper in a medium bowl. Whisk until well combined and only small bits of cheese remain intact. Broil the tenders, flipping once, until they are crisp and golden brown in spots on the outside and cooked through, 4 to 6 minutes per side (rotate the pan as needed for even browning). Transfer the tenders to a platter or to individual plates and serve with the dipping sauce.

Serving Suggestions:

As with Buffalo wings, fresh carrot and celery sticks are perfect here.

Tuesday, April 15, 2008

Stir Fry Night

As I mentioned in my last post I was just in a rut trying to decide what to make for dinner this week. I think I was also fairly tired because not counting last night’s very involved dinner I only selected fairly quick and easy meals for the menu. Tonight I went back to my New Year’s Resolution of using my underused and never used cookbooks. This is actually (Jess, sit down so you don’t faint)… the second time this year I have used one of my previously underused cookbooks, Southern Living’s Light and Easy Comfort Food. Tonight I made the Beef, Pepper, and Shiitake Mushroom Stir Fry from its Cooking for Two Section.

To make the stir fry you start by slicing the peppers, mushrooms, steak, shallot, and garlic (mince the garlic). Then heat the oil and cook the beef. Then remove the beef and wipe out the skillet. Then add all the vegetables except the mushrooms and stir fry for a couple minutes (I actually used more peppers than the recipe called for, so I did mine longer than the 1 minute the recipe says). Then add the mushrooms and stir fry for a couple minutes. Then stir in the wine and let it cook for a minute or so. Then add the broth and bring to a simmer for at least 3 minutes. Then add the beef back in and finally add the basil, salt, and pepper.

This was super fast and easy to make. The brown rice took the longest, but since I started it first it was ready by the time the stir fry was done. I love peppers and mushrooms and they really are showcased in this dish. The beef was tender and complemented the vegetables well. The sauce while very simple and fast was nothing exciting and a little bland. I love stir fry dishes and I think that this has a good base with the three colors of peppers and the shiitakes, but I think the sauce left a little to be desired. I think next time I’ll go with a stir fry similar to this one or this one both are still quick and easy, but their sauces have just a few more ingredients that give them a more exciting and tasty flavor. Next time I will use the tenderloin instead of the other cuts of beef (that the other stir fry recipes call for) and include the shiitakes. All in all it was super easy and a great week night meal. Russ rates the stir fry an 8.

Beef, Pepper, and Shiitake Mushroom Stir Fry, Southern Living Light and Easy Comfort Food
Serves 2

Cooking spray
1 teaspoon olive oil, divided
1 (6 oz) beef tenderloin steak, cut into ½ inch strips
½ cup sliced shallots
½ cup (1/4 inch thick) strips green bell pepper
½ cup (1/4 inch thick) strips red bell pepper
½ cup (1/4 inch thick) strips yellow bell pepper
3 garlic cloves, minced
2 cups sliced fresh shiitake mushroom caps (about 1 [3 and ½ oz] package)
¼ cup dry white wine
½ cup fat-free, less sodium beef broth (such as Swanson)
1 tablespoon chopped fresh basil
¼ teaspoon salt
¼ teaspoon black pepper
1 and ½ cups hot cooked rice, cooked without salt or fat

Coat a large nonstick skillet with cooking spray; add ½ teaspoon oil, and place over medium-high heat until hot. Add beef; stir-fry 2 minutes. Remove beef from skillet; set aside. Wipe drippings from skillet with a paper towel.

Heat remaining ½ teaspoon oil in skillet over medium-high heat. Add shallots, bell pepper strips, and garlic; stir-fry 1 minute. Add mushrooms; stir-fry 2 minutes. Stir in wine, and cook 1 minute. Add broth; reduce heat, and simmer 3 minutes. Return beef to skillet; cook 1 minute. Remove from heat; stir in basil, salt, and pepper. Serve over rice.

Tuesday, April 1, 2008

Simple and Yummy Chicken Fajitas

Sometimes simple recipes end up being my favorites. Tonight’s recipe came out of the fold out section at the end of Fine Cooking that has simple, quick meals that work great for weeknight dinners. What I love about a simple recipe like this is that I’ll probably never pull this recipe out again, but I’ll use it as a building block for quick dinners in the future. This recipe has just a few ingredients and the method of cooking it is very simple which makes it great for making it your own. You could easily use a variety of additional ingredients including yellow and green bell peppers, black beans, avocado slices, diced fresh tomatoes, and so on. There are so many options and I think that any twist you take on it will be delicious!
To make the chicken fajitas we sprinkled the chicken with the chili powder, cumin, salt and pepper. I’ll be honest here… I didn’t measure them all out into a small bowl. When it comes to recipes like this one I tend to not measure the ingredients. I just gave them a good sprinkling on each side of all the spices and then Russ grilled them on the Egg. We used boneless, skinless chicken breasts instead of thighs because that is what we had on hand. I put the sliced onion and red pepper in the skillet with a little oil and let them cook for a couple minutes until they were soft. I added a little salt and pepper to them while cooking. Next time I’ll add the red peppers first as they need a little longer than the onions need to soften. Once they are soft you add the garlic, cumin, and chili powder. I didn’t measure again, but just added a nice sprinkling of the cumin and chili powder. Once the chicken came off the grill, Russ let it rest and then cut it into strips on the bias. I heated the tortillas and then we filled our fajitas with chicken and the red pepper and onion mixture. I realized at this point that I had not added the lime juice, so I just squeezed a little lime juice over the fajitas. We topped them off with a little sour cream and the shredded Monterey Jack cheese.

These were incredibly flavorful and tasty. I liked the warmth from the cumin and chili powder and the nice fresh flavor that the lime juice added. While I think cooking the chicken in the skillet would work just fine, I did enjoy the grilled flavor from the Egg. These came together really quickly and worked well for an easy weeknight dinner. As I mentioned before we will definitely make a variation of these again! Russ rates the fajitas a 9.

Chicken Fajitas with Red Pepper, Onion, and Lime, Fine Cooking
Serves four.

Ingredients:
1-1/2 tsp. chili powder
1-1/4 tsp. ground cumin
Kosher salt and freshly ground black pepper
6 to 8 boneless, skinless chicken thighs (1-1/2 to 2 lb.), trimmed of excess fat
2 Tbs. canola, vegetable, or corn oil (I used canola)
1 very large or 2 medium yellow onions, quartered and thinly sliced crosswise (about 4 cups)
1 large red bell pepper, cored, seeded, and cut into strips about 1/4 inch wide and 2 inches long
3 medium cloves garlic, minced
1 Tbs. fresh lime juice
Twelve 5- to 6-inch corn tortillas
1-1/2 cups crumbled queso fresco or grated Monterey Jack cheese

Mix 1 tsp. of the chili powder, 1/2 tsp. of the cumin, 3/4 tsp. salt, and 1/2 tsp. pepper in a small bowl. Season the chicken on both sides with the spice rub. Heat 1 Tbs. of the oil in a 12-inch skillet over medium-high heat until hot. Cook the chicken without disturbing, except to flip, until both sides are browned and the chicken is firm to the touch, 3 to 4 minutes per side. If it browns too quickly, reduce the heat to medium. Transfer the thighs to a cutting board and let them cool slightly.

Meanwhile, heat the remaining 1 Tbs. oil in the skillet over medium-high heat. Add the onion, bell pepper, and 1/2 tsp. each salt and pepper and cook, stirring occasionally, just until the vegetables begin to soften, 3 to 4 minutes. Stir in the garlic and the remaining 3/4 tsp. cumin and 1/2 tsp. chili powder and cook until fragrant, about 30 seconds. Stir in the lime juice. Transfer to a bowl, cover loosely with foil, and keep warm.

Cut the thighs on the diagonal into thin slices, transfer to a plate, cover, and keep warm.
Heat the tortillas according to package directions. Fill each one with a few slices of the chicken and some of the onion mixture and cheese. Fold the filled tortillas and serve.

My Notes: We used boneless, skinless chicken breasts instead of thighs. Russ grilled the chicken for us and we used flour tortillas instead of corn. I couldn’t find the queso fresco, so we used the grated Monterey Jack. I am keeping my eye out for crumbled queso fresco, so if you happen to run across it let me know where you saw it please.

Friday, March 28, 2008

Canned Tuna: The Saga

When I started cooking for I came up with a simple and yummy pasta with tuna dish that I would make for lunch on the weekends fairly frequently. It is simple because it takes very little time to prepare and because it has only a few ingredients all of which I tend to always have on hand: pasta, a can of tuna, mayonnaise, onion, salt and pepper. The dish is fairly self explanatory based on the list of ingredients, but basically I would cook the pasta and then drain it. I would then mix it with a drained can of tuna, some diced onion, some mayonnaise, and season it with salt and pepper. I love it; however, when I introduced Russ to it he did not like it at all. He has named it “Tuna Surprise” and won’t have anything to do with it. His reaction to my beloved “Tuna Surprise” was and is still so strong that he doesn’t want to eat anything involving a can of tuna for fear of it being ever so slightly similar to my tuna dish. Well, after an almost three year hiatus from canned tuna we finally gave it another go in a new recipe tonight.

Russ spoiled me on my birthday this year including giving me two Jamie Oliver cookbooks. We both love Jamie Oliver and have a renewed interest in him after becoming hooked on his new show on the Food Network, Jamie at Home. I have been flipping through both of my new cookbooks, Cook with Jamie and Jamie’s Italy, and ran across a simple pasta with tuna dish that looked very tasty! I showed Russ the recipe and the picture of the dish and while he was hesitant he said he’d be okay adding it to the menu this week. Yeah! I gave it a go tonight and I think I can safely say we are back to eating canned tuna again!

To make the dish you start by chopping the red onion and basil stalks and then sautéing them in a little olive oil with the cinnamon. Once the onions are soft and a little sweet you add the tuna, tomatoes and their juices, and a little salt. Let this simmer for about 20 minutes. Cook the pasta until it is al dente and then drain it. Add the torn basil leaves, lemon zest, lemon juice, a little olive oil, Parmesan cheese, and pasta to the sauce. Toss it all together and taste for seasoning. I added a little more salt and pepper. Serve immediately.

Russ and I both enjoyed this dish. It is a simple, light pasta dish with great flavor from the cinnamon and basil. While the cinnamon seemed a little odd to me it worked really well in the dish and added some real depth and warmth to the seasoning. The torn basil leaves added near the end give it a pop of color and a fresh burst of flavor. I served it with a side of steamed broccoli. We both really enjoyed this meal! Russ rates it a 9.


Jools’ Favorite Saturday Afternoon Pasta, Cook with Jamie
Serves 4

Olive oil
1 red onion, peeled and finely chopped
1 – 2 red chillies, deseeded and finely chopped
1 level teaspoon ground cinnamon
A bunch of fresh basil leaves picked, stalks chopped
2 x 14 oz. cans good quality plum tomatoes
2 x 10 oz. cans good quality tuna in olive oil, drained and flaked
Sea salt and freshly ground black pepper
1lb. 2 oz. good quality rigatoni or penne
Zest and juice of 1 – 2 lemons
A small handful of freshly grated Parmesan cheese

Heat a splash of olive oil in a heavy-bottomed pan and cook the onion, chilli, cinnamon, and basil stalks on a medium to low heat for 5 minutes until the onion has softened and is slightly sweet. Turn up the heat and add your tomatoes, tuna, and a good pinch of salt. Break the tomatoes up using the back of a spoon, then bring to a boil and simmer for about 20 minutes. Taste for seasoning.

Meanwhile, cook the rigatoni in a pan of salted boiling water according to package instructions. When al dente, drain the pasta in a colander, reserving some of the cooking water. Toss the pasta into the tuna and tomato sauce with the roughly torn basil leaves, a glug of olive oil, the lemon zest and juice, and Parmesan and mix together well. Loosen the pasta with a little of the reserved cooking water if needed. Check the seasoning and serve immediately.

My Notes: I left out the chillies since I could not find them at the store. I cut the recipe in half since it was just for the two of us.

Picture Notes: My Venezuelan brother, Ernesto, was in town for a visit this past week. Ernesto, Russ, and I went with Mom and Dad to the Oklahoma vs. Louisville NCAA game together. It was a lot of fun except poor OU didn't play very well.

Monday, March 10, 2008

Maybe I don't have a sweet tooth after all...

Russ and I have lots of things in common and overall our tastes in foods are very similar. When we eat out we frequently are considering some of the same options from the menu and can predict what the other will order. I always want a bite of whatever Russ is having and he (whether he admits it or not) wants one of mine. However, tonight we found out a difference in our taste preferences that we had never known. Tonight’s dinner had a very sweet flavor to it. While you are probably thinking that I loved it Russ and didn’t care for it since I (hands down, no questions asked) have the bigger sweet tooth, you would actually be wrong. While I don’t think either of us has ever thought about it before, we discovered tonight that when it comes to meals I prefer savory while Russ enjoys both savory and sweet. Who knew!

Tonight for dinner we tried Fine Cooking’s recipe for Shrimp Stew with Coconut Milk, Tomatoes, and Cilantro. To make it you start by peeling and deveining the shrimp and tossing them with salt. Then heat the oil and add the bell pepper and cook until it is tender. Then add the scallion whites, cilantro, garlic, and red pepper flakes and cook for about a minute. Then add the tomatoes and coconut milk and bring it to a simmer. Let it simmer and reduce for about 5 minutes. Then add the shrimp in and let them cook until they are just cooked through. The recipe says to cover it partially with the lid and let cook for 5 minutes, however, Russ and I used 1 lb of shrimp and not 3 lbs and it took just about 2 minutes for them to cook through. Then add the lime juice and serve it over rice garnished with the green part of the scallions and rest of the cilantro.

This was very good, but way too sweet for my tastes. I would cut the coconut milk back by half next time at first and taste it as I go. I also could not find my favorite brand of coconut milk and had to use my not favorite brand which I find to be sweeter and I believe it is coconut cream which may be my problem… Russ really liked the sweetness and would not change a thing, so next time I might let his cook a little longer and add more coconut milk to it for that sweet flavor he liked. Besides it being too sweet I really enjoyed the dish. It does have some complexity to the flavor with the cilantro and red pepper flakes. We both really liked the tomatoes in it as it added great flavor and texture. The entire meal came together very quickly and is great for a weeknight meal. Russ rates it a 9. I will say this is the first time I would really disagree with his rating. If the sweetness were cut in half I would then agree and give it a 9. I highly recommend this dish, but make sure you get coconut milk and start with half the can and add more if you think it needs it.

Shrimp Stew with Coconut Milk, Tomatoes, and Cilantro, Fine Cooking
Serves 6 to 8

Ingredients:

3 lb. jumbo (21 to 25 per lb.) shrimp, peeled and deveined Kosher salt2 Tbs. extra-virgin olive oil1 large red bell pepper, sliced into very thin 1-1/2-inch-long strips4 scallions, thinly sliced (white and green parts kept separate)1/2 cup chopped fresh cilantro4 large cloves garlic, finely chopped1/2 to 1 tsp. crushed red pepper flakes14.5-oz. can petite-diced tomatoes, drained13.5- or 14-oz. can coconut milk2 Tbs. fresh lime juice

In a large bowl, sprinkle the shrimp with 1 tsp. salt; toss to coat, and set aside.
Heat the oil in a 5- to 6-quart Dutch oven over medium-high heat. Add the bell pepper and cook, stirring, until almost tender, about 4 minutes. Add the scallion whites, 1/4 cup of the cilantro, the garlic, and the pepper flakes. Continue to cook, stirring, until fragrant, 30 to 60 seconds.

Add the tomatoes and coconut milk and bring to a simmer. Reduce the heat to medium and simmer to blend the flavors and thicken the sauce slightly, about 5 minutes.
Add the shrimp and continue to cook, partially covered and stirring frequently, until the shrimp are just cooked through, about 5 minutes more. Add the lime juice and season to taste with salt. Serve sprinkled with the scallion greens and remaining 1/4 cup cilantro.

My Notes: We used 1 lb. of shrimp for the two of us and it was more than enough.

Monday, February 18, 2008

Removing the Training Wheels on Cooking Fish

After dinner tonight Russ made the comment that her really likes having fish for dinner and you know what so do I, but for some reason we don’t eat it near as often as we do chicken or beef. We love the flavor and texture of grouper, tuna, Mahi Mahi, halibut, salmon, and the list goes on and on. We both appreciate how quick it is to prepare and how after dinner we are full, but in a very light, clean way. There are so many varieties of fish and so many different ways to prepare them that it should have us up to our ears in recipes to try for fish. So, why is it that we don’t eat it more often… I mean really at least once a week right. I really think a lot of this has to do with my not being able to take my cooking training wheels off. You see I am picky about where I buy my fish and there are only a couple places in town where I will go for fish. I almost always buy it the day I am going to prepare it, so that it is as fresh as possible. However, this carries a risk because I usually have bought all the other ingredients for the dish and what if I get to the fish counter and they are out of salmon and my recipe calls for salmon. This is where I get nervous and panic because what if there is not an alternative type of fish that fits my recipe… then what… I still consider myself a novice cook and I did not grow up eating fish or seeing it being cooked, so I am still learning how different types of fish taste, cook, and what types are able to substitute for another type. Consequently I find it easier and less nerve wracking to just skip the fish recipes and go for the chicken because have you ever gone in the store and had them be out of boneless, skinless chicken breasts. Tonight I go to the store and my recipe calls for cod, but it lists seven other types of fish that will work well and you know what they didn’t have any of them….so I just asked the fish monger for his recommendation from what they did have and he suggested the black grouper. The black grouper worked great in fact Russ thinks he would prefer it in this recipe over the cod! I do love fish and want to have it at home more often, so I am going to try and remove the training wheels and go ahead and put fish on the menu more often and trust myself that it will turn out alright (and if it doesn't Papa John knows where we live).

Tonight I made the cover recipe from the January Fine Cooking, Cod with Mushrooms, Garlic, and Vermouth. You start by sautéing the mushrooms in a little butter for several minutes. You then add the garlic and sauté it for about 45 seconds. Next you add the vermouth, parsley, vinegar, salt, and pepper and bring it to a boil. Let this reduce by half and then add the fish to the dish. Cover the dish and leave it until the fish is cooked through. Once the fish is cooked remove it and add the last of the butter to the sauce. Spoon the sauce over the fish, add a little more parsley and serve. I served the fish with brown rice and green beans.

The mushroom sauce was fantastic! It was light, flavorful and I loved the mushrooms in it. The fish was light, flaky, and tasty. Cooking the fish with the lid on allowed the fish to cook through while staying moist. This came together very quickly in fact I had to wait to start it to give the brown rice ample time to cook. Russ and I both really enjoyed this dish. Russ rates it a 9.

Cod with Mushrooms, Garlic, and Vermouth, Fine Cooking January 2008
Serves four.

4 Tbs. cold unsalted butter
10 oz. white or baby bella (cremini) mushrooms, wiped clean and sliced about 1/8 inch thick
4 medium cloves garlic, minced
½ cup dry vermouth
3 and ½ Tbs. chopped fresh parsley
1 Tbs. balsamic vinegar
½ tsp. kosher salt; more to taste
¼ tsp. freshly ground black pepper; more to taste
Four 6 oz. skinless cod fillets

In a heavy 12-inch skillet, melt 3 Tbs. of the butter over medium-high heat. Add the mushrooms and cook, stirring only occasionally, until well browned, 5 to 7 minutes. Add the garlic and cook, stirring, until golden brown and fragrant, about 45 seconds. Add the vermouth, 3 Tbs. of the parsley, the vinegar, salt, and pepper and boil until the liquid is reduced by half, about 2 minutes.

Remove the pan from the heat, lightly season the cod with salt and pepper and add it to the pan (tuck under the tails if necessary to even out the thickness), nesting the fillets into the mushrooms and spooning some of the mushrooms on top.

Bring the mixture to a gentle simmer over medium heat, cover the pan, reduce to medium low, and simmer until just cooked through (use the tip of a paring knife to check), 7 to 12 minutes, depending on thickness. With a slotted spatula, transfer the fish to serving plates or a platter. Over low heat, whisk the remaining 1 Tbs. butter into the sauce. Spoon the sauce over the fish and serve sprinkled with the remaining ½ Tbs. parsley.

Variation: This recipe works well with many types of fish. Mahi mahi, pollock, haddock, sole, flounder, sea bass, and halibut make perfect substitutes; just reduce cooking time for thinner fillets.

Monday, February 11, 2008

Quick Chicken Roll Ups

After college I moved to Charlottesville, Virginia for graduate school. Sophie, the family Pomeranian, and I lived together in a cozy two bedroom apartment for two years. This was my first time to live without a roommate, a non-furry one that is. When I moved back to Birmingham I moved into another apartment by myself for a year before buying a condo. After living alone for several years I was ready to have a roommate again. I was excited when Elizabeth was moving back to Birmingham and we decided to be roommates in the condo. There are definitely great things to be said about living alone, but I was ready to have someone else around at night after work to talk to, eat with, and just have around. Living together was a lot of fun and one of the best parts was our shared interest in cooking. We would cook together almost every night after work and it was a wonderful experience to share with her. Once Seth and then Russ joined the picture you could find the four us eating together most nights. After Elizabeth got married and moved out we no longer cooked together every night, but we still enjoy getting together frequently to cook and eat together. Even though we both have different roommates now, Elizabeth and I still love to talk about cooking, share recipes, and get together to cook and eat.

Tonight’s dinner is a recipe that Elizabeth and I developed to mimic one of our favorite dishes at a local restaurant. We ate this at least once a week while we lived together as they were simple, quick, and delicious. To make the Chicken Roll Ups you start with cooked chicken. Russ smoked a beer can chicken last night just in case the turkey wasn’t big enough for everyone, so that is what I used. Elizabeth and I would either buy a rotisserie chicken at the grocery store or cook chicken tenders (often after marinating them in Italian dressing) on the indoor cast iron grill. You can pretty much cook it anyway you like but once it is cooked either shred or chop it into small pieces. Then sauté sliced onion in a little olive oil. Once they are mostly cooked add cut up tomatoes (I used grape tomatoes that I quartered) until they are heated through. I seasoned these lightly with salt and pepper. You then start an assembly line with the chicken, flour tortillas, crumbled feta, onions and tomatoes. Lay out a flour tortilla and add a little bit of all the ingredients to the middle and then roll it up. Once you have made all the rolls then place them on a lightly greased grill pan or skillet and let them heat through on each side for a couple minutes. Serve them with salsa for dipping.

These are so quick and easy to make that it is perfect for a busy weeknight or a night when you are really tired, but still want to eat at home. If you are having a really busy week then a great way to get quick dinners at home is to buy a rotisserie chicken and use it for the rolls ups one night and in other ways such as a salad or tacos another night. This recipe is also a great way to use up leftover chicken. The roll ups have great flavor with the feta adding a nice taste. After they are heated the feta turns soft and is just delicious. I also like the combination of onions and tomatoes. I think next time I might add cut up kalamata olives to the mix. You can really mix up the ingredients in lots of different ways to suite your taste. Russ rates the roll ups a 9.

Thursday, February 7, 2008

Super Yummy Tomato Soup

As you probably know by now I LOVE soup and I love it in any form thick and chunky, thin and pureed, brothy, with meat, without meat… Russ likes soup, but I am not sure he feels quite as passionately about it as I do. He also tends to prefer just the hearty soups that include meat; however, he has a soft spot in his heart for Campbell’s Tomato Soup. This is his go to soup when he is not feeling well, but he likes it paired with a grilled cheese sandwich even when he is healthy and feeling fine. Call me a food snob, but I’ll be honest I really can’t eat Campbell’s soup unless I am super sick and no one will bring me Hot and Sour Soup or Chicken Corn Chowder from the Chinese restaurant. So, when Fine Cooking had an entire section on tomato soup I was elated because we could now both enjoy a meal of tomato soup since it wouldn’t be coming out of the red and white can. I let Russ pick which recipe we try first and he selected the Classic Tomato Soup. While the other recipes sound a little more interesting and different what better place to start than with the classic. So, I made it and I am in LOVE with this soup and once Russ eats the last can of Campbell’s Tomato Soup that is sitting in the pantry I will never buy it again because this was so, so, so much better and super easy to make.To make the soup you start by heating the oil and butter in a large Dutch oven and then adding the garlic and onion until they are soft. Then mix the flour in with the garlic and onion until they are combined. Next add the broth, tomatoes, sugar, thyme, salt and pepper. (A couple things on the can of tomatoes: First be sure and buy a high quality brand of tomatoes. Second, I realize that you are buying a can of whole tomatoes just to puree it, however, I forbid you to buy a can of pureed tomatoes for this recipe. You will be compromising the taste and it only takes a couple seconds to puree the whole tomatoes.) Bring this to a simmer while stirring and then reduce the heat to low, cover it, and let it simmer for 40 minutes. Once it has simmered remove the thyme sprig and throw it away. Then puree the soup. I used a hand blender which if you don’t have one is a very useful thing to have for making soups or smoothies (which is why Russ bought ours). Then taste it and add salt and pepper as needed. Ours needed both with a little more salt than pepper. You can then top it with any of the garnishes mentioned in the recipe. I went simple and just used a dollop of sour cream. After tasting it though I am definitely going to garnish it with thin slices of fresh basil next time.This soup is so simple and really quick to make except for the 40 minutes of simmering and the taste is fabulous! Both Russ and I were blown away with what great flavor it had! We both thought it would be good, but it was really fantastic with a light, fresh tomato flavor and a smooth texture. My only complaint is that I wish I had made more. Next time I make it I will definitely double if not triple this recipe. The leftovers will be eaten tomorrow for lunch, but this would freeze really well. It would be a great soup to make and stock your freezer with the leftovers for a cold, rainy day or really any ole day for that matter. We served ours with a side of cheese toast, but I think a small salad of mixed greens with balsamic vinaigrette would be another great side option. Russ rates the soup a 10.

Classic Tomato Soup, Fine Cooking February / March 2008
Yields about 8 cups, serves eight (Russ and I had it as an entrée, so in our case it would serve 4)

2 Tbs. extra-virgin olive oil
1 Tbs. unsalted butter
1 large white onion, finely chopped
1 large clove garlic, smashed and peeled
2 Tbs. all-purpose flour
3 cups lower-salt chicken broth
28 oz. can whole peeled plum tomatoes, pureed (include the juice)
1 and ½ tsp. sugar
1 sprig fresh thyme
Kosher salt and freshly ground black pepper
3 Tbs. thinly sliced fresh basil, chives, or dill, or a mixture of all three (omit if using one of the garnishes below)

In a nonreactive 5 to 6 quart Dutch oven, heat the oil and butter over medium-low heat until the butter melts. Add the onion and garlic and cook, stirring occasionally, until soft but not browned, about 8 minutes. Add the flour and stir to coat the onion and garlic.

Add the broth, tomatoes, sugar, thyme, and ¼ tsp. each salt and pepper. Bring to a simmer over medium-high heat while stirring the mixture to make sure that the flour is not sticking to the bottom of the pan. Reduce the heat to low, cover, and simmer for 40 minutes.

Discard the thyme sprig. Let cool briefly and then puree in two or there batches in a blender of food processor. Rinse the pot and return the soup to the pot. Season to taste with salt and pepper. Reheat if necessary. Serve warm but not hot, garnished with the herbs or dolloped with one of the garnishes below.

Add a creamy touch:
Sour cream, goat cheese, and Parmesan garnish: In a small bowl, combine ½ cup sour cream with ¼ crumbled goat cheese. Add 1 Tbs. freshly grated Parmigiano-Reggiano, 1 Tbs. thinly sliced chives, and 1 tbs. extra-virgin olive oil. Mix thoroughly and season to taste with kosher salt and freshly ground black pepper. Add a dollop to each serving.
Crème fraiche, herb, and horseradish garnish: In a small bowl, combine ½ cup crème fraiche with 1 Tbs. minced fresh dill and 1 Tbs. minced scallion. Add ½ Tbs. well-drained prepared horseradish and mix well. Season to taste with kosher salt and freshly ground black pepper. Add a dollop to each serving.